

 |
|
|
Headings
Heading keymarks are used to keymark different types of heading elements. There are ten heading keymarks and ten heading merge keymarks in TNTEdit.
|
Keymark |
Definition |
|
HEADING 1 | HEADING 1 |
|
HEADING 2 | HEADING 2 |
|
HEADING 3 | HEADING 3 |
|
HEADING 4 | HEADING 4 |
|
HEADING A | HEADING A |
|
HEADING B | HEADING B |
|
HEADING C | HEADING C |
|
HEADING D |
HEADING D |
|
RIH1 |
RunIn Head type 1 |
|
RIH2 | RunIn Head type 2 |
Heading 1-4 and Heading A-D keymarks can all be applied via shortcut keys or via the Heads dialog.
Place the insertion point in the paragraph you want to keymark.
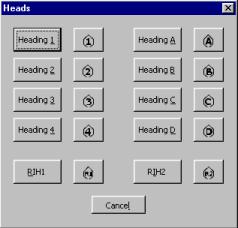
Click the Heads button on the toolbar, press Ctrl + Alt + H or choose Heads from the right mouse button menu to bring up the Heads dialog:

Click the heading keymark you want to apply.
Place the insertion point in the paragraph you want to keymark.
Press the shortcut keys to apply the heading keymark:
| Heading 1 | Ctrl + Alt + 1 |
| Heading 2 | Ctrl + Alt + 2 |
| Heading 3 | Ctrl + Alt + 3 |
| Heading 4 | Ctrl + Alt + 4 |
| Run In Head 1 | Ctrl + Alt + R, 1 |
| Run In Head 2 | Ctrl + Alt + R, 2 |
| Heading A | Ctrl + Alt+ A |
| Heading B | Ctrl + Alt + B |
| Heading C | Ctrl + Alt + C |
| Heading D | Ctrl + Alt + D |
|
|
Heading D Merge
Run In Head 1 Merge
|
Place the insertion point where you want to insert the merge.
From the right mouse button menu choose Heads or press Ctrl + Alt + H or click the Heads button on the toolbar.
The Heads dialog opens.

Choose the Heading Merge Keymark by clicking on one of the buttons with the diamond-shaped merge icons.
 |