

 |
|
|
Shortcuts |
Tables
Tables are created in separate table documents. Start a new TNTEdit document and click the Table option from the Document Type section. You should now have a new TNTEdit document in the screen. The table document is set up with landscape orientation to accommodate wide tables.
Click the Insert TNT Table button on the toolbar ![]() ,
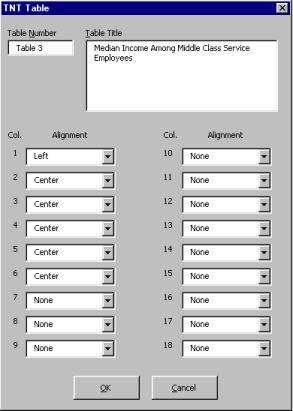
or select right mouse > TNT Tables > Create/Convert TNT Table. The TNT Table dialog
opens:
,
or select right mouse > TNT Tables > Create/Convert TNT Table. The TNT Table dialog
opens:

Enter the number of the table in the Table Number field. The word "Table" is already inserted, however you can change this to whatever you want.
Enter the table title in the Table Title field.
Select the alignment for each column in the table using the alignment drop-down lists. Choose alignments only for the number of columns you want in the table and leave the remaining columns set to None.
Press OK.
You should now have a table on the screen, with the same number of columns as the number of columns you chose alignments for.
You can now enter text or numbers into the table cells.
There are a number of keymarks available for keymarking table cells. You can keymark cells using the TNT Tables right mouse button menus.
Select the cell or cells you want to keymark.
From the right-mouse menu choose TNT Tables.
The TNT Tables right mouse menu appears.

Select the keymark menu for Table Heads [TH] or Table Body [TB].
Choose the keymark you want to apply.
|
Table Heads (TH) |
|
|
Keymark |
Definition |
|
TH_FL |
Table Head, Flush Left |
|
TH_CTR |
Table Head, Centered |
|
TH_FR |
Table Head, Flush Right |
|
TH_DEC |
Table Head, Decimal Align |
|
TH_STRADDLE |
Table Head, Straddle 2 or more cells |
|
Table Body (TB) |
|
|
TB_1/2L |
Table Body, 1/2 Line space |
|
TB_1L |
Table Body, 1 Line Space |
|
TB_FL |
Table Body, Flush Left |
|
TB_FL_HANG |
Table Body, Flush Left, Turns Hang |
|
TB_FL_IND1 |
Table Body, Flush Left, Indent, Turns Hang |
|
TB_FL_IND2 |
Table Body, Flush Left, Indent, Turns Hang |
|
TB_FL_IND3 |
Table Body, Flush Left, Indent, Turns Hang |
|
TB_CTR |
Table Body, Centered |
|
TB_FR |
Table Body, Flush Right |
|
TB_DEC |
Table Body, Decimal Align |
|
TB_BULLET |
Table Body, Bullet List
|
|
Other Table Keymarks |
|
|
TN |
Table Number |
|
TT |
Table Title |
|
TFN |
Table Footnote |
|
|
You can quickly adjust an entire table using TNT Table Adjust.
Place your cursor within the table you want to adjust.
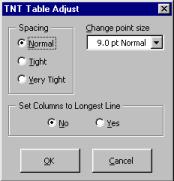
Press the TNT Table Adjust button on the toolbar ![]() or select right mouse > TNT Tables > TNT Table Adjust. The TNT Table Adjust dialog opens:
or select right mouse > TNT Tables > TNT Table Adjust. The TNT Table Adjust dialog opens:

Adjust the spacing of the rows and columns with the spacing options.
Use Change point size to adjust text within the table to take up more or less room.
Use Set Columns to Longest Line to adjust the width of each column to accommodate the longest line of text in that column.
If you have a table that was not created with TNTEdit you can easily convert the table to TNTEdit.
Place the insertion point anywhere within the non-TNTEdit Table.
Click the Insert TNT Table button on the toolbar ![]() ,
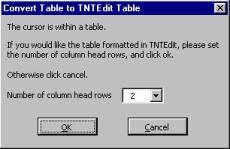
or select right mouse > TNT Tables > Create/Convert TNT Table. The Convert to TNTEdit
Table dialog opens:
,
or select right mouse > TNT Tables > Create/Convert TNT Table. The Convert to TNTEdit
Table dialog opens:

Choose the number of column head rows. This is the number of rows at the top of the table that are or will be keymarked as table heads.
Press OK.
The table is converted to a TNTEdit Table, you can now keymark the cells using the TNT Table Keymarks.
The convert table to text function is a Microsoft Word® function that has been added to the TNT Tables right mouse button menu for convenience.
Place your cursor inside the table.
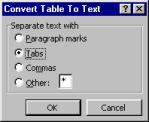
From the right-mouse button menu select TNT Tables > Convert Table to Text
Choose the Separate Text With option.

Press OK
The table is converted to text with the separator you chose placed between each cell.
 |